Paper Quilling
Introduction to The Art of Paper Quilling
Paper
Quilling
This
antique craft will challenge your creativity.
By Lana J. Bates
In my search for unique gifts to handcraft for my family, I found a photograph of a quilled picture so delicate and intricate it seemed like a fine-line drawing.
 |
It set my creative gears awhirl, and for a week I worked late and had fun experimenting with my newfound interest. I never dreamed that my hobby would grow into a business.
Nearly 10 years later, my first quilled floral arrangement (framed as a birthday present for my mother-in-law) is still one of my favorite pieces. But as I became more involved with the craft, the enthused response of family and friends, added to my own interest in quilling, spurred me to make my own designs. I expanded into Christmas ornaments and eventually built up an inventory large enough to enter my work in a local arts and crafts show.
Now, after years of quilling, I can assure you that the opportunities opened up by this unusual and highly flexible medium are endless. It's given me a profitable part-time income (my biggest thrill was earning $900 in a farmers' market Christmas crafts show), and I love teaching quilling workshops to children and adults.
An
Inexpensive Investment
Getting started in paper quilling, the art of
paper sculpture, is not expensive. You'll need a few basic materials that
you can buy at most arts and crafts stores.
A paper
quilling tool, a metal instrument with a tiny slit in one end, will
probably cost between $1 and $1.50 (I'm still using my first one). You'll
also need a package of quilling paper, which runs around
$1.75 and will last for quite some time. I buy wholesale from Quill Art
(11762 Westline Dr., St. Louis, MO 63141; 314/872-3181; catalog $1), because
I like the feel of its paper, though I'm sure other companies offer comparable
quality.
Try a multicolored pack, which will give you an array of shades to play
with. (I use 1/8"-wide paper, though other widths are available,
and, again, you should experiment to see what suits your creativity best.)
Other necessities are a bottle of white glue (I prefer Sobo), hatpins
or toothpicks for applying it, and a sheet of Con-tact-brand clear adhesive-backed
paper. A clipboard or a 9" X 12" piece of heavy cardboard can
serve as a flat work surface.
To set up your workboard, tape a sheet of white or graph paper (later you may want to substitute a design you've sketched) onto your work surface. Peel a piece of Contact the size of your workboard and tape it to the surface sticky side up. It will hold the paper curls in place until you want to remove your completed piece. Now you're ready to go.
Creative Paper Quilling Curls
To get a
feel for your quilling tool, cut a piece of paper a few inches
long, and—holding the instrument in your right hand (left for lefties)—insert
one end of the paper into the slit. Now turn the tool clockwise, gently
guiding the paper.
Once the paper curls, release it from the tool. You can let the resulting
curl expand as much or as little as you wish, and you can shape it by
pinching or pressing it with your fingers. When you're happy with your
design, press it gently onto the Con-tact paper and—where necessary—carefully
apply a dab of glue with a hatpin or toothpick to hold the shape together.
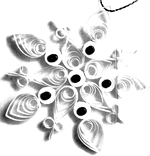
To gain confidence, begin by experimenting with the basic shapes illustrated here. As the photos show, you can combine individual shapes to form an endless variety of flowers, snowflakes, butterflies, birds, and abstract art. When you're satisfied with the design, glue the shapes together. Let dry, then lift the artwork from the Con-tact; it's ready for use.
My larger creations, mostly one-of-a-kind originals, I put into three-dimensional frames that I buy wholesale from Intercraft Industries Corp. (P.O. Box 1227, Statesville, NC 28677; 704/873-2591; free catalog). I sell these pictures for $10 to $35.
I also make
delicate quilled Christmas ornaments to which
I add small beads. My minipictures I frame in wooden curtain rings. They
are pretty additions to the wall or Christmas tree, or I can hang them
as a mobile.
These rings come wholesale and unfinished from Gould Mersereau Co. (P.O.
Box 1231, Long Island City, NY 11101; 718/361-8120; free catalog). When
they arrive, I sand and stain each, then place a small screw eye at the
top. The snowflakes and minipictures sell for $2.50 and up apiece.
Once you've mastered the basics and made a few pieces, you'll probably want to come up with some curls of your own.
Business Advice
For those who decide to turn quilling into cash, here
are a few words of wisdom.
First, make sure you've built up a substantial inventory before you apply for acceptance into an arts or crafts show.
Second, order attractive business cards. I can't stress enough how valuable this investment can be. I've gotten more orders than I can count by having cards available for browsers at all crafts shows. I also enclose one with any purchase.
Finally, since many people have no idea what quilling is, it's wise to type up a little sheet on the history of quilling, in this unique craft and run off copies for those who are interested. (See "The Traditional Art of Quilling" sidebar.) I've framed one and hang it wherever I have my work on display.
About
the Author:
Lana Bates, who considers herself a self-taught craftsperson,
has also taken art courses at the Universities of Connecticut and Hartford,
as well as the Wadsworth Atheneum. She has experimented with sculpting,
painting, collage, pastels, drawing, and, during the past decade, quilling.
Paper Quilling | Introduction to The Art of Paper Quilling
2007 Quilling Resources